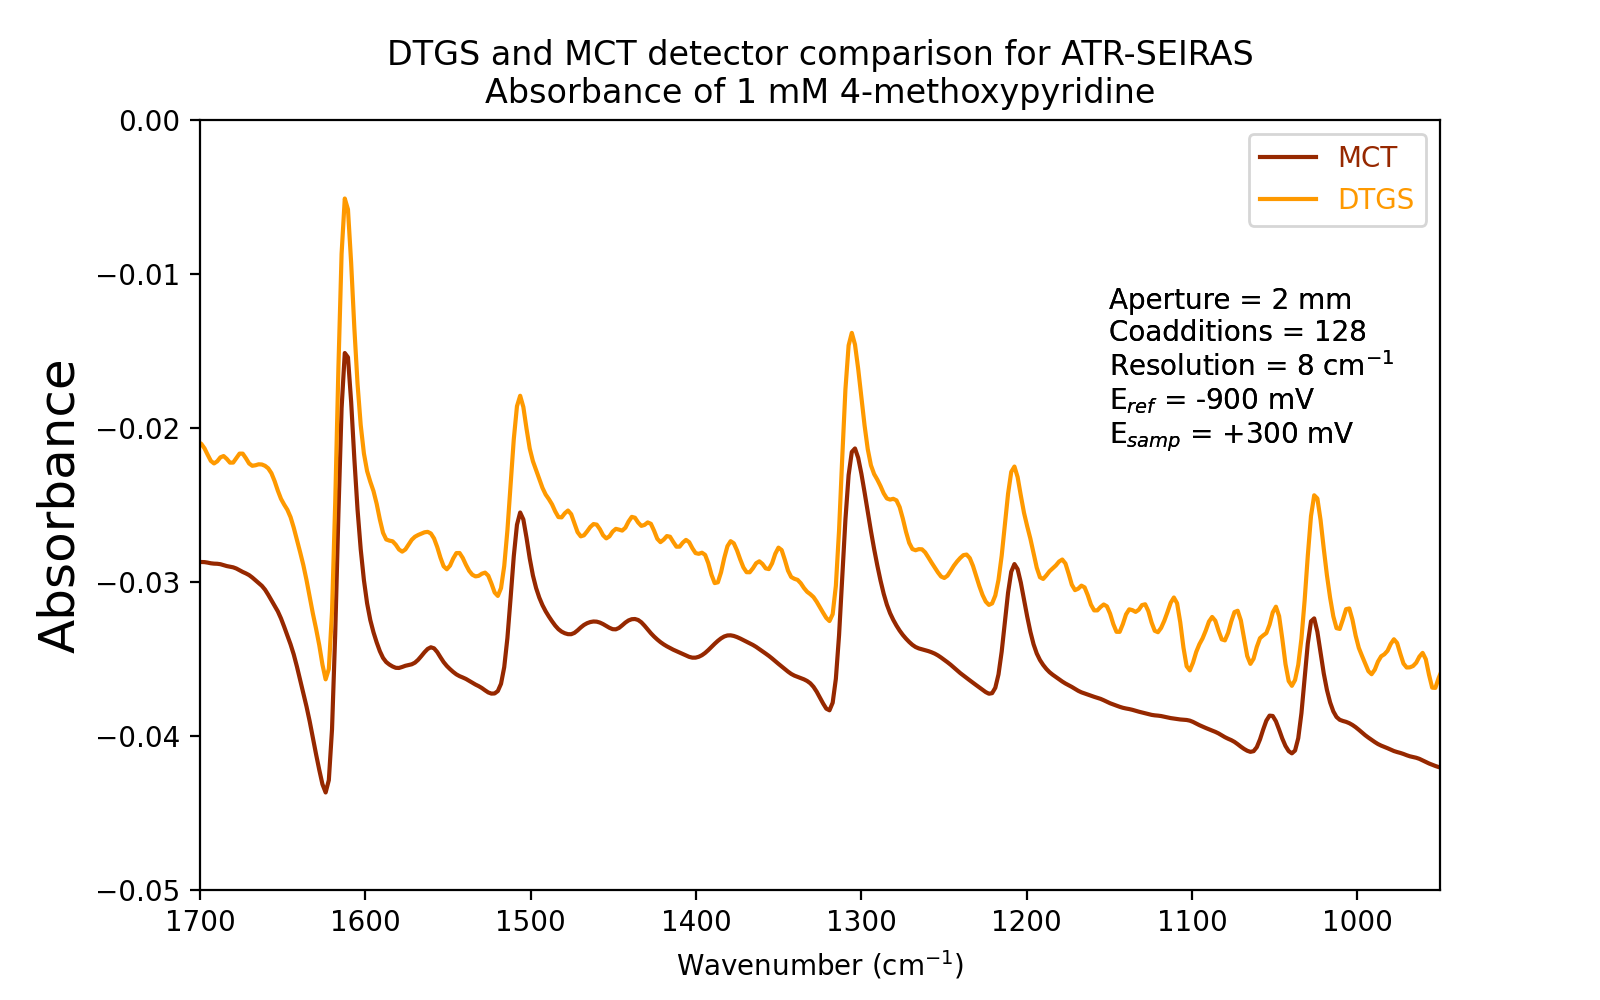
Posted on

Preparing ATR crystals for deposition of SEIRAS layers

The topic of preparing internal reflection elements (IREs) for thin film deposition comes up from time to time and we thought it might be helpful to address it in a blog post. The level of cleanliness required depends on the application and the method of deposition. Electrolessly deposited films require scrupulously clean surfaces, while the cleanliness conditions are relaxed somewhat if a conductive metal oxide underlayer is used for electrodepositing a metal film. This short article describes what works for us, but your mileage may vary.

Assuming there are no major visible scratches in the IRE, you shouldn’t need to use any polish coarser than about 3 micron. We use polycrystalline diamond suspensions to polish the crystals, such as the DIAMAT line of products from PACE Technologies (no affiliation with Jackfish SEC).  We polish in two steps: first with 3 micron, and then follow it with 0.5 micron. It’s possible to go even finer if your application calls for it. A cloth polishing pad is wetted and charged with the polish. Separate polishing pads should be used for each different grit. Applying light pressure and using a figure-8 motion, the crystal is lapped against the polishing pad. Too much water may cause the crystal to hydroplane across the surface of the pad without any polishing action.

It’s important to take care to avoid contaminating the finer grits with larger abrasive particles. When changing grits, it’s a good idea to take a new pair of gloves and wipe down the work surface. Long sleeves can be a culprit for transferring abrasive particles, so it’s best to roll them up or avoid baggy sleeves.

IREs can take several different forms: hemispheres, face-angled crystals (FACs) or even micromachined silicon wafers. The grooved wafers are rather fragile and difficult to hold on to while polishing. Instead, the wafers can be immersed in a solution of aqua regia (3 parts HCl to 1 part HNO₃) to strip off any metal or conductive metal oxide on the surface. After mixing the aqua regia, wait for it to cool down to room temperature. In our experience, 5 minutes is plenty to completely remove a 25 nm thick ITO layer at room temperature. Aqua regia can be used on FACs as well, however it should not be used on crystals which have an antireflection coating, since this can be damaged by concentrated acids. Also, one should never use acid to clean a ZnS or ZnSe prism which will dissolve the crystal and release toxic gases.

After removing the coating from the IRE (either chemically or by polishing), we typically sonicate in ethanol and then in water using a Teflon beaker so that the crystals don’t chip against the side of the beaker. After each step, we rinse with copious millipore water and blow dry with clean, dry air or inert gas from a cylinder.

Considerations for conductive metal oxide coatings

In a previous post, we discussed our preferred method of using conductive metal oxide underlayers (such as ITO) as a means to electrodeposit metal films from electrolytes containing metal ions. If you have an ITO-coated IRE with electrodeposited metal, it can often be reused several times. Extended contact with electrolyte causes ITO layers to fail, so it’s best to disassemble the cell and store the ITO-coated IRE dry between experiments. Rinse the top surface with millipore water to remove residual electrolyte and blow dry gently with inert gas. Make sure nothing brushes against the top of the film (the lower o-ring can be a culprit), since this can damage the metal film which is fairly delicate.

If the SEIRAS performance starts to decline, or if you want a new metal film, it may be possible to remove the metal while retaining the ITO . Our electrodeposited metal films can be removed by gentle polishing with 0.5 micron grit for a short time while keeping the ITO intact. This may not be ideal from a contamination standpoint, although if you’re in a bind, it can extend the use of an IRE without requiring access to vacuum-deposition equipment.

Posted on

Choosing between J1 and J2 cells

With the release of the J2 cell, you may be wondering which Jackfish cell is the most suitable for your research. The table below contrasts the features of the two cells to help you decide which cell might be a better fit.

J1J2

This image has an empty alt attribute; its file name is J1_500px.png

This image has an empty alt attribute; its file name is J2_500px.png
Material PurityAll wetted components made of glass, FKM/FFKM, and PTFE/PEEK. all components can be rigorously cleaned according to standard electrochemistry proceduresUnder normal use, the wetted materials are glass, FKM/FFKM, and PTFE/PEEK. The PTFE-coated rubber septum is exposed to solvent vapours. Celcon compression caps cannot be acid washed.
Electrolyte optionsGround glass joints designed for use with aqueous electrolyte.Completely sealed cell design is compatible with volatile solvents.
Counter electrodeJackfish offers a choice of Pt or Au CE. Extra 7/14 ground glass joints are supplied for users to utilize a metal wire of their choicePt CE available as an add-on. Standard 6 mm diameter compression-style fitting accommodates a variety of third-party electrodes.
Reference electrodeReference arm is separated with a stopcock which acts as a salt bridge preventing migration of RE filling solution into the cell body.

Jackfish offers Ag/AgCl RE, or the user can supply their own to fit in the 18 mm ID reference arm.
Electrodes are inserted directly into the cell in close proximity to the working electrode, reducing the impedance.

A standard 6 mm diameter compression-style threaded port accommodates a variety of aqueous and non-aqueous commercial electrodes.
Air-sensitive chemistryOnly possible by greasing the ground glass joints. Wetted ground glass joints slowly evaporate water to the environment and are unsuitable for use in a glovebox.Completely sealed design can be used with Schlenk technique, or in a glovebox.
Minimum cell volume20 mL (including reference arm)10 mL

You might also want to check out our product release video for the J2 which walks through the differences between the cells in a bit more detail.

If you can’t decide which cell is best for you, or if you want to take advantage of the features of both cells, we do offer a combo discount available if both cells are purchased at the same time.

Posted on

Webinar: Microsecond Resolved IR Spectroelectrochemistry Using Dual Frequency Comb IR Lasers

Back at the end of May, our own Ian Burgess gave a presentation on time-resolved spectroelectrochemistry using the Jackfish cell. These types of experiments are made possible by using an tunable infrared laser source as opposed to a globar. The webinar was hosted by IRsweep AG, a manufacturer of a tunable laser-based IR spectrometer.

The first 10 minutes of the webinar gives an overview of the dual-frequency comb technology as applied to IRsweep’s IRis-F1 spectrometer presented by Raphael Horvath. This introduction is followed by Ian’s 20-minute presentation on the first use of dual comb spectroscopy (DCS) for time-resolved ATR-SEIRAS measurements. Ian presents the desorption of a pyridine derivative as a test system to demonstrate a 10 μs time resolution. The DCS instrument provides a huge reduction in experiment time compared to a conventional step-scan experiment that would otherwise be required to achieve comparable time resolution. This presents exciting possibilities for the monitoring of transient species adsorbed to the electrode during electrocatalysis. The webinar is concluded with a 10 minute Q&A period.

Many thanks to IRsweep for facilitating the webinar. Click here to view the VOD of the webinar.